Saturday, January 11, 2014

I'm back!

I haven't been diligent in my blogging efforts, I know. However, I'm still very active in all things "decor" and "DIY" and have been quite the busy bee! All of my latest posts stem from my Facebook page "Decorating Damsel". I will slowly incorporate all of my projects and makeovers onto my blog too! 

Over the last year + I have conquered nursing school, having just graduated December 14, 2013. Back in January 2013, we sold our home after two short days on the market! We found our forever home and closed on it back in July 2013. We also got pregnant with our second child, only to lose him after carrying him for four months. It has been the craziest, most tragic -  and also gratifying -  year for me. 

While I mourned the loss of our baby boy, I immersed myself in home projects and finishing my final semester of nursing school. Decorating and organizing has always been a passion and escape for me.  Fortunately, there were (and are still) countless home projects to tackle. 

So let's call this post a re-introduction! I will introduce a series of photos and projects: there are many! To whomever reads this, I thank you. : ) 


Wednesday, October 10, 2012

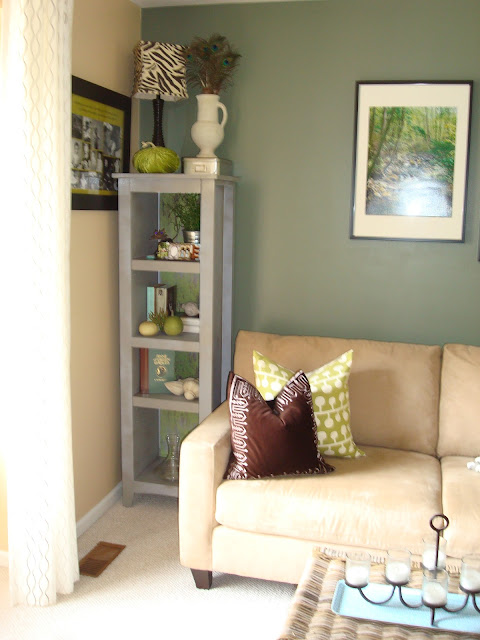
$4.65 Upcycled Bookshelf

I had this old, espresso, fake-wood bookshelf from Target just sitting in the basement collecting dust & cobwebs.  I KNEW I had saved it for SOME reason!  I decided to get my spray gun out and go to town on it!  2 coats of primer, 2 coats of a warm gray paint, and 3 coats of a glossy poly, and here we go!  Then, I went to Hobby Lobby in search of the perfect scrapbook paper to line the back of the cabinet.  At $.29 cent ea (4 sheets), this was awesome!  I'm only sorry that I got SO excited to tackle it, that I forgot to take the "before" photo!  

Total cost for this bookshelf upcycle: $4.65!  
(primer & paint were from my basement)


Sunday, September 30, 2012

Fall Mantle

This month has just flown by!  While I've been wrapped-up with Nursing School, I've managed to carve-out time for home projects as well.  I've decorated our Fall mantle, purchased & repurposed an antique buffet (we will use as our tv console in the family room), bought men's sweaters to make my sweater pillows, and replaced our old 'builder-basic' ballisters with beautiful wrought-iron ones.  I owe you tons of photos detailing these projects.  Some are still underway.  But here is my Fall mantle, and my pretty little pumpkin table centerpiece for now.


These are real pumpkins I got from the farmer's market this past weekend.  I spray painted them and added these decals I got from Michael's.  I love 'em!


More gorgeous pumpkins from the farmer's market.....


Monday, September 10, 2012

Fall is in the air....and I smell change a-brewing!

Fall is in the air!  I made homemade chili this weekend, and my 'famous' chocolate chip banana bread.  Mmmm....I also completed one of my sunburst mirrors that I blogged about last.  A second one will be started & finished today.  :)  I will post the results asap.

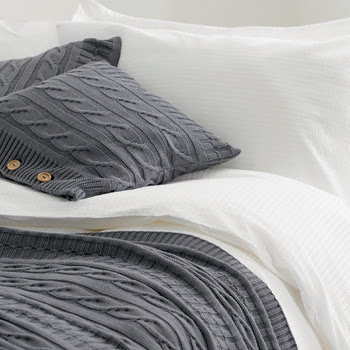
But I'm also getting antsy for yet another project.  And I've decided that it's going to be making sweater throw pillows!

I think sweater throw pillows are GREAT for Fall/Winter.  Plus, I've been wanting to change-out my throw pillows around the house for a little while now.  Want to see what I'm talking about?  Here are a few examples:


I also love those grain sack pillows, with the simple burlap & stripe look.  But I'm focusing on my sweater pillows for now. :)

Here's my plan: Head to our closet & convince Hubs to let me reincarnate some old sweaters that never get worn into some gorgeous sweater pillows.  Also, I REALLY want some with pattern.  Comfy cozy and men's-wear-looking.  I'd love some argyle & herringbone patterns.  So, to the Salvation Army I shall go!  I'm going to pick up some CHEAPY sweaters & turn 'em into gorgeousness to adorn my sofas & some beds. :)

Also, on another topic, I'm ready to replace the ugly, but utilitarian 'coffee-table-ottoman' that sits in our family room.  It's black fake-leather.  And it's really just a rectangular storage ottoman for all of my 2-year-old's "STUFF".  He rarely plays w/those toys anymore.  Come this winter, I'm going to clean out the closet by our garage entry (the garage entry/mudroom gets its makeover this coming Dec/Jan), & make toy space there for him, & so I'm getting rid of the storage ottoman from the family room asap.  I never liked it.  But it was CHEAP solution last Fall that we got for $20 at Meijer in the college section of back-to-school.  What I'd LOVE in its place is this:


This coffee table is actually topped with reclaimed wood.  It comes from Home Decorators Collection, and while the price tag isn't BAD at $343 (on sale from $429) & ships for a whopping $65, it's NOT in our budget WHATSOEVER.  I HAVE however seen the REAL thing in antique stores in the past (shoot me now for not jumping on them at the time).  So, Hubs & I are going to take a mini-excursion today & hunt for the perfect "coffee table" at antique stores.  You know what'll probably happen though....now that I'm LOOKING for it, it WON'T be found.  Anywhere.  *Sigh*  But I'm willing to give it the 'ole college try. 

Speaking of college....I got an A on my nursing exam last week. :)  The joy doesn't last long however.  It faded in about 3 seconds when I knew the next one would be 2 short weeks later & it's an exam that is notorious for people failing.  I'm NOT gonna be in that statistic!  I spent this weekend studying to say the least.  

I'll report back with my projects!  What decorating projects are YOU tackling for Fall/Winter?  Tell me about 'em!  

Monday, September 3, 2012

DIY Cedar/Driftwood Sunburst Mirror

I have to admit, I do enjoy these sunburst mirrors.  We've all seen them.  And admired them.  Those with money can actually buy them (<----not me).  Those of us without money can ADMIRE them.....or think up ways to hack the design & make them ourselves for FAR less money.  (Those who can't buy - MAKE!)

I was navigating Thrifty Decor Chick's blog, & stumbled across her own DIY hack of the sunburst mirror.  So, I'm here to say that I didn't come up with the 'how to' on this DIY project, but I am going to make it myself.  Here's the high price version ($349!) on Ballard Design's website:


Here is Thrifty Decor Chick's DIY version:


Now it's time for me to put MY skills to the test.  I should be able to accomplish this look for $10-$20 each.  I will let you know & post my pics!  I can study for my nursing exam this week all while the glue & paint dry!  Stay tuned......

Sunday, September 2, 2012

New kitchen light

Continuing on mine (& Erik's) new obsession, we decided to MAKE another DIY-light for above the kitchen sink since we loved how the DIY chandelier turned out in the dining room.  We went with more light cages & Edison bulbs & hung our light semi-flushmount (it's barely a pendant), with 2 lights hanging down.  These got sprayed painted as well, and wired through some inexpensive lamp fixtures from Home Depot, in keeping with that "found" & industrial/vintage look.  Here is how the light turned out:


Friday, August 31, 2012

Drum roll please! Home-made industrial/vintage chandelier!

I'm going to post this on my DIY page, but wanted to write a separate post about my newest project.  For more photos of the 'during' phase of this chandelier project, check out the DIY tab. :)

When Hubby & I moved in to our home 4 years ago, we changed nearly every lighting fixture.  However, in 4 years' time, mine (& his) styles have dramatically morphed, & luckily, we share a similar view & compromise when we don't.  You MIGHT just say, we have the perfect marriage!

ANYHOW, while I wanted to start a new DIY chandelier project, I wasn't rushing.  With nursing school having just finished its 2nd week of the new semester, I am SUPER busy.  Luckily for me however, I more or less gave him my directive & 'vision', & he did his share of work on this project with me.

I'll explain more, but for now, you just HAVE to see it!!  
(Scroll down for directions on HOW to make)


Okay, so here it is, the 'how-to':

First step: I went antique shopping, looking or the PERFECT old lamp shade.  (the middle shade featured).  The 'uglier' & MORE intricate the shade, the BETTER, TRUST ME.  You have to envision what it will look like when you STRIP off all of the old dirty fabric around the shade.  The more wire it has, the better the result will be.  Also, I LOVE the scalloped edges - I think it gives a femininity to the fixture.  The cost for the shade: $10 exactly. 

ANYHOW, take a knife & scissors to the shade & TEAR that baby up.  The old ones tend NOT to be glued on (bonus; less messy), but they ARE sewn on, so it'll take some work.  Total time to strip: maybe 20 minutes.  

Next: went online & searched for the 'cages' seen here on the right & left sides, positioned slightly higher than the middle shade.  They cages (& the shade in the middle) did not COME this color - you'll have to paint them the color of your choosing.  I chose a satin black finish.  Each cage cost $4, purchased online.  THAT'S ALL!  YAY!  Then, you just open it up (how it's shown above), to make it look like a pretty flower. :)  Make sure you get exactly the openness that you want, because once you paint it, you need to stick with that.  

Paint them all the same color....or not.  I contemplated painting the middle (large) shade a blue/green, but, mixed that idea in the end.  

Next step: go to Ikea.  Buy 3 of their lamp kits - the wire (already black) w/the socket attached.  They are $5 each, so this cost $15 total.  If you don't have an IKEA near you, World Market sells them in different colors, but I think they are $13.   

Purchased the light 'bar' from ebay for $20.  It was white.  I painted that satin black as well.  It had white wires that it came with (& light socket), but the color was all wrong.  Just strung the IKEA ones through it, & we were good to go.  Cut the cords once threaded in the bar.  They come VERRRRY long.  

Then just hang your fixture & add 3 filament bulbs!  (Dimmer suggested)  

I love this so, so much!  $53!!!  We are going to make a 2-light 'mini' version of this (less costly too) for above the kitchen sink & spray everything satin nickel/chrome.    

So do it!  Go out & make yours today!  You'll love it & won't be able to stop staring at it!!