Friday, August 31, 2012

Drum roll please! Home-made industrial/vintage chandelier!

I'm going to post this on my DIY page, but wanted to write a separate post about my newest project.  For more photos of the 'during' phase of this chandelier project, check out the DIY tab. :)

When Hubby & I moved in to our home 4 years ago, we changed nearly every lighting fixture.  However, in 4 years' time, mine (& his) styles have dramatically morphed, & luckily, we share a similar view & compromise when we don't.  You MIGHT just say, we have the perfect marriage!

ANYHOW, while I wanted to start a new DIY chandelier project, I wasn't rushing.  With nursing school having just finished its 2nd week of the new semester, I am SUPER busy.  Luckily for me however, I more or less gave him my directive & 'vision', & he did his share of work on this project with me.

I'll explain more, but for now, you just HAVE to see it!!  
(Scroll down for directions on HOW to make)


Okay, so here it is, the 'how-to':

First step: I went antique shopping, looking or the PERFECT old lamp shade.  (the middle shade featured).  The 'uglier' & MORE intricate the shade, the BETTER, TRUST ME.  You have to envision what it will look like when you STRIP off all of the old dirty fabric around the shade.  The more wire it has, the better the result will be.  Also, I LOVE the scalloped edges - I think it gives a femininity to the fixture.  The cost for the shade: $10 exactly. 

ANYHOW, take a knife & scissors to the shade & TEAR that baby up.  The old ones tend NOT to be glued on (bonus; less messy), but they ARE sewn on, so it'll take some work.  Total time to strip: maybe 20 minutes.  

Next: went online & searched for the 'cages' seen here on the right & left sides, positioned slightly higher than the middle shade.  They cages (& the shade in the middle) did not COME this color - you'll have to paint them the color of your choosing.  I chose a satin black finish.  Each cage cost $4, purchased online.  THAT'S ALL!  YAY!  Then, you just open it up (how it's shown above), to make it look like a pretty flower. :)  Make sure you get exactly the openness that you want, because once you paint it, you need to stick with that.  

Paint them all the same color....or not.  I contemplated painting the middle (large) shade a blue/green, but, mixed that idea in the end.  

Next step: go to Ikea.  Buy 3 of their lamp kits - the wire (already black) w/the socket attached.  They are $5 each, so this cost $15 total.  If you don't have an IKEA near you, World Market sells them in different colors, but I think they are $13.   

Purchased the light 'bar' from ebay for $20.  It was white.  I painted that satin black as well.  It had white wires that it came with (& light socket), but the color was all wrong.  Just strung the IKEA ones through it, & we were good to go.  Cut the cords once threaded in the bar.  They come VERRRRY long.  

Then just hang your fixture & add 3 filament bulbs!  (Dimmer suggested)  

I love this so, so much!  $53!!!  We are going to make a 2-light 'mini' version of this (less costly too) for above the kitchen sink & spray everything satin nickel/chrome.    

So do it!  Go out & make yours today!  You'll love it & won't be able to stop staring at it!!  

Wednesday, August 29, 2012

Luxury Guest Retreat

These are the photos of our guest room in our home.  We are fortunate enough to have enough space to be able to have a dedicated space for guests, so I really wanted to dive-in.  Don't let that fool you though!  If you know me & follow my posts, you will know that this too was done on a teensy-weensy budget.  I could have gone far less expensive though.  We bought the dresser & bed new when we moved in.  Don't get me wrong, I LIKE it, but I've since come to ADORE vintage finds, & if I had to do it all over again, I would have much preferred to find some vintage steals & transform them.

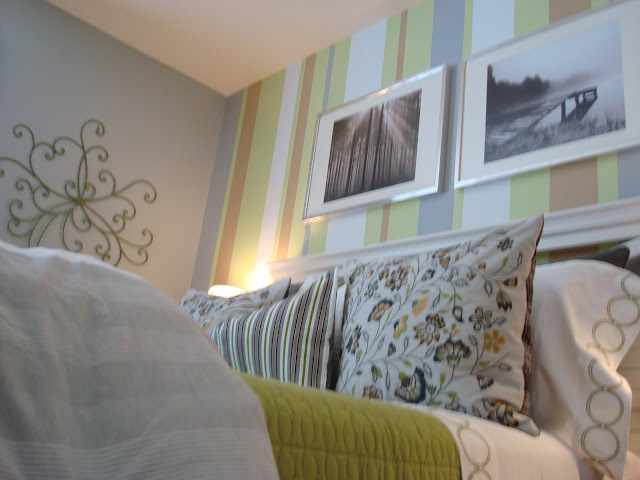
The feature wall: all paint.  It took an entire day (sun up to around midnight!), but it was SO worth it.  The room (to start) was painted that bright shade of green (all 4 walls).  I am having a love-affair with the color grey however (& have been for a couple of years).  I knew I wanted to keep the green in some form or another, & add grey & the color palate began from there.  I drew inspiration from one piece (read further below for details), & ASIDE from the grey color, used existing cans of paint that I already had stored in the basement (F-R-E-E!).  Erik, my right-hand-man/hubby/soul-mate & I grabbed a laser light, aimed & got our straight lines.  We would level it on a ladder, & then I went along the laser lines with blue painters tape.  Once I had taped the line straight, Erik went from top to bottom with a credit card to REALLY adhere it to the wall, so NO paint would "bleed" through.  The lines are CRISP & perfect.  This looks like wallpaper from far enough away.  Let me just tell you - it took a LONG time, but it was EASY work.  I will not HESITATE to do this treatment again in our next home.  :)


These two printed pillows, from IKEA, were my inspiration.  I had my eye on them for a LONG time, just KNOWING I had to hurry-up & design a room around them (or at least buy them) before IKEA stopped selling them.  The room was either going to go yellow & grey or apple-green & grey, and since I'm not a huge lover of yellow (very particular about which shades), I favored the apple-green.  It JUST so happens that the striped pillow in the middle matches the pillow & my chosen color palate, so I bought that pillow cover from IKEA as well.  The far back Euro shams are from IKEA as well.  The middle white throw pillow, coverlet, sheets, & comforter are all pieced-together from Kohl's.  I don't DO bed-in-a-bag.  I'd much rather suffer through hunting for the perfect pieces than ever succumb to buying a bed-in-a-bag.  


While I DO love this room & pieced it together from various sources, this is the one room in my home that is weighed-heavily with IKEA finds.  I don't know if anyone lives as close to one as I do.  They are affordable & have nice things.  BUT if anyone knows IKEA like I do, they will know a ton in this room came from the store.  That is my only regret.  I really do prefer a more collected look.


This is an old trunk that I had for years.  It is a cheapy.  I didn't HESITATE to spray paint it!  It is PERFECT in the room!  


Yes, I DO love spray paint.  And I LOVE the color apple-green.  It is sprinkled in smaller doses in my formal living room & foyer.  But here, it saturates the room to marry with the grey & liven-up the otherwise calm & neutral room (grey, white, beige & APPLE GREEN).  So, the metal scroll & set of 3 scrolls are all spray-painted.


Mis-matched end-tables.  Perfect in my opinion.  When we DO decide to move, I will find a KILLER area rug for the new guest room as well.  


Lamp: from Pottery Barn kids.  
They carry much more whimsical lighting than it's adult-version Pottery Barn. :)  


Kitchen 100% complete - BEFORE pic included!

I went through my zip-drives and FOUND IT!  A single kitchen photo, with the kitchen in its original state.  Ouch.  It is bad!  ......'wanna see....???


And here is the "AFTER" in its entirety:


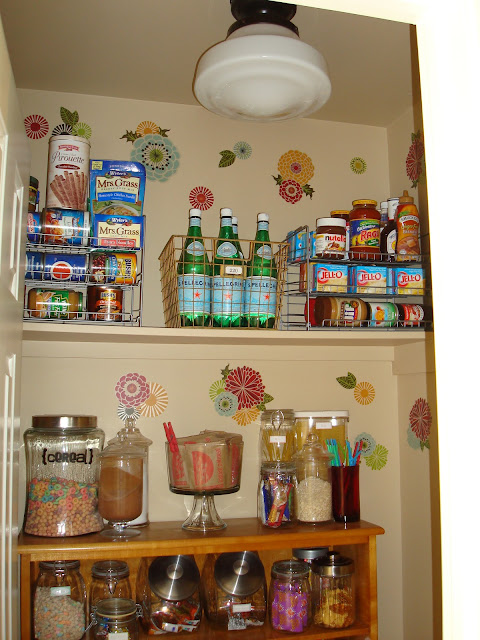
...And I thought I'd throw in a couple of pantry photos for fun too.  
Why not showcase your pantry if it's pretty & organized?
My door is always open! 

BTW, that light is about 90 years old!  Erik & I found & purchased 4 of them at an antique shop in Ohio for $25 each!!!  They came from an old hardware store!  I nursed them back to health by way of steel-brushing the rust off, and painting with Rustoleum in an aged bronze & Erik bought CHEAP re-wiring online!  We have one in the main foyer & two off the garage-foyer entry too.


Tuesday, August 21, 2012

Crown molding underway

Erik & I were out & about this past weekend "window shopping" for some crown molding for the kitchen (where the soffit meets the ceiling).  I am in love with the "dental" molding I see out there.  It looks very classic & craftsman to me.  Well, we found a big chunky one that was awesome.  THEN.....we found one we like even BETTER, for way less money because it's not even wood!  But BELIEVE me, you would never know when it's painted & installed.

So, downstairs I marched to break-out my paint sprayer & spray them all out the same color as our kitchen cabinets.  BEAUTIFUL.  Once they were dry, we held them up and well, "BEAUTIFUL" is all I can muster!  We only have (at the moment) about 30% of the install complete, but I can't resist sharing a photo of the 'in-progress' work.  We haven't patched everywhere there are teeny gaps yet & still have to touch-up with some paint to match where we DID touch-up, but here is the progress SO FAR:


Total cost of the project...ready for this? 

$69!
  
And, just to remind you of what it DID look like,
here is a photo of the same soffit:


So, I think the work might be finished this week & we can move on to getting the new faucet installed. :)  Erik says he may even want to put crown molding in the dining room now...  Which, by the way, got a mini-makeover!  I will post photos once the homemade chandelier project is complete to show it off.

Tuesday, August 14, 2012

Dreaming of a baby girl nursery

I'm not pregnant.  JUST so you know!  And, I don't plan on being pregnant this year.  If 'it' happens next year at all, it wouldn't be until the VERY end of the year either.  But that's not going to stop me from dreaming-up designs for a little girl's nursery!

I've had a keen idea for a long while now that it would be light grey, white & purple (deep purple).  HOWEVER, I just came across this gorgeous baby girl bedding in land of nod yesterday (it's new!).  I could still get by with a grey, white & purple color palate, but this introduces a vibrant yellow into the mix as well.  I love the quilt, with it's array of different patterns that mix well.  I love how it looks graphic & modern, despite having a 'country quilt'.  Perfect compliment in my eyes!  Want to see it???
Of course you do!


I would lay down either carpet tiles, or a large graphic rug, that covers all but the perimeter of the room's floor.  The rug would be either purple & white, or grey & white (two colors; keep it simple).

The walls: urban sunrise by Valspar.  A light grey.  The ceiling would be painted the same color.  However, in the middle of the room, I would paint a HUGE, WIDE dark purple stripe (we're talking like 4-6 feet wide), and the stripe would rise up from the floor, up the wall, wrap-up onto the ceiling, and down the other side.

The crib would look something like this (not this exact one, but I love the decorative spindles, so one very similar to this style):


I think a day bed in the room would work as well.  That way, "mom" could catch some winks in-between baby waking in the middle of the night.  And.....when baby outgrows the crib, she can just go straight to the day bed.  Here's an example from IKEA:
I have a ton of lighting ideas too, & art, & furniture (vintage, vintage, vintage & painted & adorned with gorgeous custom knobs/pulls) & drapes (think homemade from canvas drop cloths courtesy of Home Depot, then stenciled & painted!), but I'm holding-out for now!

"Antique" faucet & cabinet molding

It may seem like all I've been writing about is "kitchen stuff", and you'd be right to assess that!  I promise I have other rooms & ideas to discuss, and I'll be posting a few ideas today.  But this one is going to address the LOVELY kitchen faucet that I'm drooling over.  I love it because it looks like kitchen "jewelry".  It has that pretty antique character to it, while being brand new!  Two pieces of great news: (1) the faucet I found retails for FAR less than it's look-a-likes at $102 plus shipping (I've seen them for over $500); and (2) the faucet is available on amazon.  If you open up an amazon credit account, you get an immediate $50 credit off any purchase!  This means.....my faucet will be HALF OFF at $52 plus shipping!  I am a savvy bargain shopper!  Go me!  Okay, okay....want to SEE this faucet I'm raving over?  Here "she" is:

Next topic:  Cabinet molding.  This isn't a project we'll be likely to execute until next year unless hubby gets inspired to do it prior to that (In this case, I just come up with the idea, & he needs to execute this one).  With me starting my next semester of nursing school next week, I"ll be focusing my energy on clinicals & studying.  I want to add thick, craftsman-looking molding (something chunky, but NOT ornate) to the top of the cabinets, where they meet the ceiling.  And I want to spray them out the exact color as the painted cabinets, so they appear like custom-to-the-ceiling-cabinets, RATHER than a big fat ugly plain soffit over the cabinets.  Knowing I wanted to do this, I then saw a great photo, depicting this same thing, so here is a great example of what I'm talking about:


Funnily enough, the ceiling is the same faint painted blue as ours!  This photo above comes from a Sarah Richardson design.  I am utterly star-struck with her.  If I had ONE person to meet (famous) and pick their brain or have over for dinner, it would be Sarah Richardson.  I love, love, love her.  And I love her assistant Tommy.  She is incapable of designing an ugly room.  Anyhow, in this photo above, the had the homeowner's cabinets painted, the soffits painted the same color, and added the molding to the top of the soffit to give the illusion of custom cabinetry.  Cheap cost for an expensive look.  Now that's my theme for decorating!

In other news, the new drapes in the kitchen are purchased & hung.  I have a panel hanging on either side of the doorwall.  I bought a third panel, and CUT it up, to make a custom homemade window valence as well.  Looks cute, if I do say so myself!  I'll post photos, but I think I want to wait until the new faucet it ordered & installed first.

As for the kitchen chairs, I've decided on a color.  It hit me: I can go shopping in my basement for the PERFECT color & paint them for F-R-E-E!!  Woohoo!  It just so happens that I have a rusty-red color paint on the lower-half of my dining room walls.  And when I hold up the new drapes to that wall color, the same rusty shade of red is in those drapes.  So I'll just paint my chairs that same red & poly them with a nice shiny clear gloss.  This won't happen until sometime in December though.  It's a free pick-me-up, as I mentioned.  I guess in a perfect world, I'd select NEW chairs that give a more eclectic-modern look to balance the kitchen into looking a bit more contemporary & modern/industrial.  These are the 'perfect-world' chairs I'm talking about (from IKEA; $80 each):


Thursday, August 9, 2012

New kitchen drapes about to arrive!

Okay, I am pumped.  Way pumped.  Even though I love the rug under the table in the kitchen, hubby wishes it were gone, saying it makes the area appear more open.  I don't really think the area NEEDS to look 'more open', but I have relented to get rid of the rug.  However, without the rug, the kitchen is seriously lacking in pops of color & fabric.  Sooo... I am getting these AMAZING drapes from World Market that I have drooled over for months on end.  Also, I am going to buy a third drape, so I can hand-make a valance for over the window (matching the drapes on the doorwall).  ALSO, still in-keeping with needing MORE color in the room, I'm going to PAINT the kitchen chairs.  It'll give me an excuse to break-out my NIFTY new summer toy: my paint sprayer!!!  I am thinking a shade of burnt red from the drapes, but would welcome opinions!  Of course, there is always that blue color, but I already have blue/orange/green accents in the kitchen.  I also have a wire basket in that shade of yellow.  THOUGHTS?  I need a color.  But truly, I'm thinking the contender is the burnt red color.


Again, here is a photo of our table & chairs.  


The switch plates made it up yesterday.  Lovely - and I never thought I'd be commenting on the 'loveliness' of a SWITCHPLATE!!!  But they really do help disappear into the backsplash.  :)  So, it looks like I'll be posting FRESH pics as early as a few days from now.  We get the drapes tomorrow.  Then I need to get a little paint for those chairs.......

Tuesday, August 7, 2012

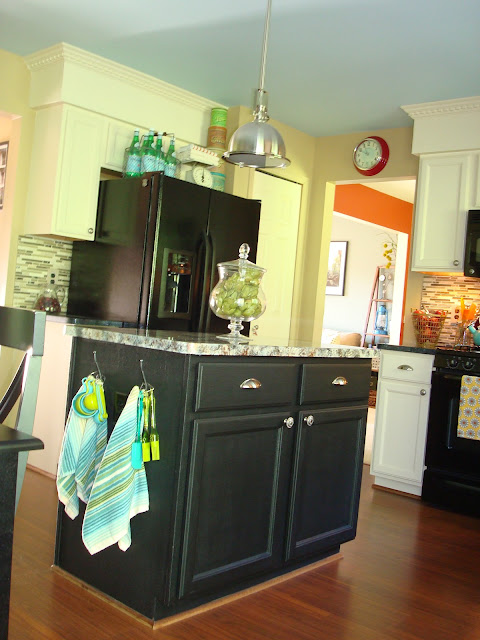
Budget KITCHEN, with PAINTED laminate counters!

After pressuring hubby endlessly since the DAY we got our house 4 years ago, I got the green-light on the shoestring kitchen re-do this Spring/Summer.  Over the course of the summer, I:

* painted the ceiling a faint blue;
* painted the island;
* bought a paint sprayer & sprayed all my cabinets (myself!);
* painted the walls (noticing a trend here: PAINT, PAINT, PAINT) to match the walls in the family room; 
* changed the cabinet hardware; 
* installed under-cabinet & corner cabinet lighting (IKEA)
* added hooks to the island (IKEA peg rack/removed the hooks/installed them on the island);
* PAINTED my LAMINATE countertops & poly'd them my own version of faux granite (no kits purchased - just a good primer rolled on, a million shades of acrylic craft paint on the island, glaze, & glitter all over the island counter) 
* installed a brand new travertine & glass tile backsplash (we bought with gift cards over time & all the tile was sitting in our basement, ready for install!)

TOTAL COST OF BUDGET RE-DO: (about $700!!!)


I love my rug!  Found originally on Home Decorator's Collection....then hunted it down on overstock for WAY less moolah.  Yay me!  HOWEVER, it's going to be swapped-out in place of some gorgeous (busy) drapes.  I'm sure I'll use it again somewhere, someday.  :)


Close-up of my painted island countertop.  If you happen to think it's pretty, I promise you'd think it was gorgeous IN-PERSON.  And WAY sparkly.


Thinking I'm going to make my own little curtains for above the window......
....and as for the faucet....OMG it is BEAUTIFUL.  I'll post pics once we have it in!
The tile was the first job I've ever done...and hubby too.  It took 12 hours the first day.  And a few hours the next day grouting.  I thought tiling was bad.  Grouting was AWFUL.  LESSON LEARNED.  I had to spend 3 days SCRAPING each tile in order to get dried grout OFF!  YUCK!  Of course, we love the outcome, but it was a PAIN!  The new switchplates are going to be stone, to blend in.  The old were black.


Hubby put in IKEA lighting in this corner cabinet & underneath the uppers.


Yes, you saw two antique kitchen scales.  I can't help myself.  Love 'em!


Sorry this one's blurry...


View facing the family room...


And here's the family room view from the kitchen.  The two spaces are TOTALLY open to one another, so I didn't want to fight that.  I use complementary colors for both rooms.


We put the lighting in over the last year.  And we had the floors installed when we originally moved in (we love them), along with brand new appliances 4 years ago.  So, just what I spent this summer to get this end-result: LESS THAN $700 (as stated earlier)!  About $400 of that was just the backsplash!  Here is a photo of one of the stages of the kitchen as of 2 years ago (during the holidays):
(I will see if I can dig up the ORIGINAL...which is NASTY, just warning you when it comes....)


I can't stress this enough - while I am very pleased with the kitchen, & need to still get the new switch plates up & faucet in, I NEVER feel 'camera-worthy'.  I am pleased with my space, & LOVE & am obsessed with all things decorating, I never feel like my work is 'done'.  So I've always been shy about showing off photos of the house.  I am forcing myself to break-free of that however, because if I continue on that path, I will NEVER post pics, because the house is LITERALLY never done.  Whenever friends/family come over to visit, they wander the house looking for "what's new" that Susan did.  Haha.  The house is ever-changing.  So, keep checking-in with me, because the entire home is ever-evolving.....!